ADJUSTMENTS AND VERIFICATIONS ON EVERY DAY OF USE
MAKE SURE THE BLADE TENSION IS TIGHT BEFORE STARTING
FOR MILLS EQUIPPED WITH THE HYDRAULIC BLADE SYSTEM, SCREW TO A MINIMUM OF 1250 PSI FOR SMALL LOGS UP TO A MAXIMUM OF 2000 PSI FOR LARGE LOGS OR VERY HARD WOOD.
FOR THE MANUAL TENSIONING SYSTEM OF THE BLADE, THERE IS NO DIAL JUST SET TO VERY TIGHT TO SET THE MANUAL TOGGLE WITH THE RIGHT PRESSURE. IS IF YOU ARE NOT CAPABLE OF CLOSING THE TOGGLE IT MEANS THAT IT IS TO TIGHT.
THIS IS TO SAY THAT YOU HAVE TOO MUCH TENTION.
IF THE TOGGLE IS TOO EASY TO CLOSE IT MEANS YOU DO NOT NOT ENOUGH TEN-
TION.
THE TOGGLE SHOULD BE VERY TIGHT REQUIRES BOTH HANDS TO SET IT RIGHT BUT IF TO TIGHT YOU WILL NOT BE ABLE TO CLOSE IT.

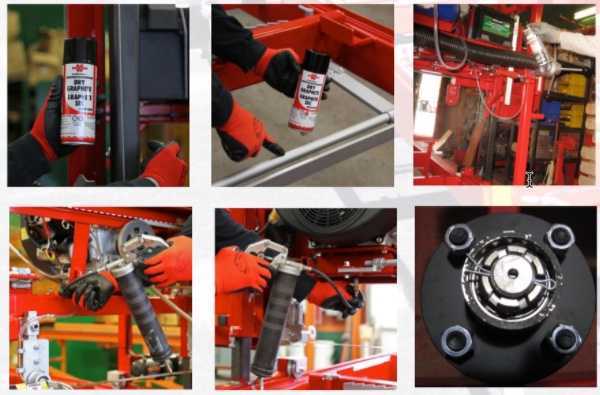
LUBRICATE THE HEAD POST, DOG LOGS AND ENGINE CARIGE WITH SILICONE LUBRICANT OR DRY GRAPHITE.
USE ZERO GRADE GREASE FOR ALL THE ZERKS GREASE FITTINGS
AFTER THE FIRST 10 HOURS OF USE, VERIFY AND RESTORE THE DRIVE BELT AS REQUIRED. ALSO CHECK THE BALL BEARINGS OF THE WHEEL (FLYWHEEL) RETORQUE IF REQUIRED.
3 YEARS WARRANTY !!!
We are so convinced of the quality and durability of our Valley mills that we will repair or replace, at our discretion, any defective parts resulting from manufacturing and assembly defect for a period of three years from Date of purchase by original owner (except for blades, belts, ball bearings and sawbrake). However, then warranty is one year for electrical components (eg winch, battery, …) and hydraulic hoses.
Company and Contact Information
PASCAL MÉTAL INC.
SCIERIES MOBILES VALLÉE
1825, ROUTE 222
ST-DENIS DE BROMPTON QC J0B 2P0
TÉLÉPHONE : (819) 846-0340
CELLULAIRE : (819) 212-8474
STORAGE
RELEASE BLADE TENSION REMOVE THE BATTERY, RECHARGE ONCE A MONTH WASH AND GREASE BEFORE STORAGE CHANGING THE ENGINE OIL BEFORE REMOVING DRAIN HOSES OR WASHER LIQUID IN LUBRICATION AND RESERVOIR SYSTEM. KEEPING WITHOUT WEAKNESS INFLATING TIRES TO RECOMMENDED PRESSURE
TRANSPORTATION
LEAVE THE TENSION ON THE BLADE FOR TRANSPORT (MANUAL BLADE TENSION) RELEASE BLADE TENSION TO 250 PSI (HYDRAULIC OPTION)ALWAY,S CLEAN YOUR SAW MILL ATTATCH THE BOLT MOUNT TO THE CHASSIS, LOCK MOUNTING SUPPORT LEGS, HOOKS AND POST + CYLINDER MAKE SURE THE TOWING STEM IS FIXED TO THE CHASSIS VERIFY TRAILER LIGHTS AND TIRE PRESSURE
PART NUMBER
BALL BEARING (RAIL WHEEL) # 6202-2RD-QE6 ORDINARY QUALITY * EX-
CEPT THE MINI BLUE MODEL BALL BEARING (BLADE GUIDE ROLLER) #
6202-2RSH / C3 SUPERIOR QUALITY

SAFETY INSTRUCTIONS
ALWAYS WEAR SAFETY GLASSES, HAT, HEAVY GLOVES, KEEP FINGERS FROM THE CUTTING SURFACE NON-COMPLIANCE WITH THESE INSTRUCTIONS AND WARNINGS MAY RESULT IN SERIOUS PERSONAL INJURY TAKE ADVICE OF MANUALS FOR THE ENGINE AND WINCH.
BEFORE BEGINNING ALWAYS SAW WITH CLOSED PANEL KEEP REMOTE CHILDREN FROM MILL.
IF YOU HAVE ADDITIONALS QUESTION PLEASE GIVE US A CALL. OUR STAFF WILL BE PLEASE TO ANSWER ALL OF YOUR QUESTION.
ADJUSTING THE ENGINE BELT
LOSEN THE DRIVE ROD TURN CLOCK WISE TO TIGHTEN THE BELT AND COUNTER CLOCK WISE LOSEN THE DRIVE ENGAGEMENT TO ADJUST THE ACCELERATION ROD ,TURN CLOCK WISE TO INCREASE SPEED OR COUNTER CLOCK WISE TO DECREASE THE SPEED OF THE ENGINE.
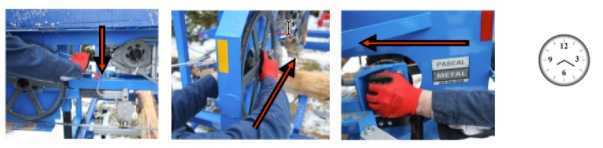
ADJUSTING THE BRAKE
SCREW TO INCREASE THE BRAKING OR SCREW TO DECREASE
(SEE PHOTO)

SAWING
HAVE A GOOD INVENTORY OF BLADE AND CHANGE EVERY 2 HOURS.
(RECOMMENDED) IF YOU FEEL THAT THE MILL IS DIFFICULT TO PUSH, IT IS PROBABLY THAT YOUR BLADE NEEDS TO BE CHANGED OR SHARPENED
ADJUSTING THE BLADE GUIDE ARM
TO CUT SMALLER LOGS AND HAVE MORE ACCURACY, ADJUST THE BLADE GUIDE ROLLERS TO CLOSER LOG POSITION FOR LARGE LUGS, REMOVE THE CASTERS IN RELEASING THE LEVER AND PULLING THE HANDLE
FOR LARGE LUGS, REMOVE THE CASTERS IN RELEASING THE LEVER AND PULLING THE HANDLE

BLADE CHANGE
ALWAYS STOP THE ENGINE, ALWAYS WEAR SAFETY GEAR ON.
- PULL ON THE RED HANDLE (UNSCREW THE HYDRAULIC LEVER ),
- PRESS THE BLADE DOWN AND REMOVE THE USED BLADE.
- PUT THE NEW BLADE ON THE FLYWHEELs
- PUSH BACK THE CAMLOCK IN PLACE UNTIL TIGHT THE BLADE TIGHTEN TO FACTORY
SPECS - TIGHTEN THE HYDRAULIC SCREW TO 1500 AND 2000 PSI BLADE. (HYDRAULIC OP-
TION)
HANDLING OF BLADE
NB: FOLDING THE BLADE IS NOT NECESSARY IF YOU ARE NOT CONFORTABLE HANDELING THE BLADE DO NOT FOLD .
ALWAYS WEAR SAFETY GEARS ON.
1-FOLD THE BLADE MAKE A ROUND WITH THE TOOTH BLADE FACING YOU
AND POSITION YOUR HANDS AT 4:30 AM AND 8:20 AM
2 -PUSH THE FRONT BLADE AND TURN THE WRIST AS YOURSELF (INYARD) TO AC-
CELERATE , TO CLOSE YOUR HANDS ONE INTO THE OTHER.
3 -INPUT THE LEFT HAND WITH THE RIGHT NOW, WITH THE RIGHT HAND RELEASED,
AND CLOSE BOTH ENDS TOGETHER
4 -RETURN THIS LOUPE OVER THE BOTH OTHERS AND ATTACH T EVERYTHING TO-
GETHER.

ALWAYS WEAR SAFETY GEAR ON.
UNPLUG THE BLADE 1 KEEP THE BLADE WITH THE LEFT HAND
THE TEETH TOWARDS THE OUTSIDE,
TAKE THE SUPERIOR BLADE WITH RIGHT HAND BY LEAVING IT FALLING
,SLOWLY RELEASE THE RIGHT HAND. ALWAYS KEEPING OTHERS UN LOUPS WITH LEFT
HAND.
YOU HAVE TO BE CAREFFUL WHEN UNFOLDING , ALWAY WEAR PROTECTION

TABLE OF CALCULATION OF WOOD ON FOOT (PMP)
Start-up of your sawmill
1– Set the mobile sawmill to levels using all the adjustable jacks and set the proper lenght of the fix stabilizers, use the bubble levels located at the front of the sawmill to guide you.
2– Remove the two safety nuts which fix together the base and the the sawmill head (used for the transportation mode).
3– Check the correct rolling of the sawmill head and adjust the levels if necessary. The sawmill head must have a smooth and stable rolling.
4– Open the front panel of the saw compartment, and check the blade tension, adjust if necessary, always wear your protective items.
5– Check the cleanliness and rotate the steering wheel several turns, the rolling should be smooth without obstruction, the blade should be suitably fitted on the bearing parts.
6– Open the water valve for the lubrification of the blade, engage the ONE-Step-Go lever to verify that the lubrication is normal and fluid.
7– Turn the engine ignition key to ON, and check that the automatic cutting head lift (winch) works correctly.
8– You are ready to start the engine, let the engine warm up for a few minutes, then you can engage the One-Step-Go lever for a few seconds to warm up the sawmill.
Everyday cutting:
-Check engine air filter
-Check the rolling
Every week:
-greasing of the posts (dry graphite)
-Motor maintenance (consult the engine manual)
– Lubrication of all lubrication Zerks
-Full cleaning of sawmill compartment
Every year:
-Motor maintenance (consult the engine manual)
-Degreasing and relubrification of the two axles
-Full lubrication of all bearings
We strongly suggest to cover your sawmill with a protective canvas for storage periods
Refer to engine manual for storage procedures
Good sawing and remember to always wear your protective items.
Safety Matters
INTENDED USE This sawmill is designed for sawing logs while the mill is firmly supported on the ground.
GENERAL SAFETY RULES ITEM DESCRIPTION Gasoline Engine Honda Maximum Log Diameter 30” Maximum Board Width 22”Maximum Board Thickness 7” Blade
Size refer to chart table ” WARNING! Read and understand all instructions. Failure to follow all instructions listed below may result in electric shock, fire and/or serious injury. WARNING! The warnings, cautions, and instructions discussed in this instruction manual cannot cover all possible conditions or situations that could occur. It must be understood by
the operator that common sense and caution are factors which cannot be built into this product, but must be supplied by the operator.
WARNING! Only operate the engine in a well ventilated area. Carbon Monoxide produced by the engine during use can kill. Do not use indoors, near windows or in other sheltered areas. NOTE: All Federal and State laws and any regulation having jurisdiction covering the safety requirements for use of the machine take precedence over the statements in this manual. Users of this machine must adhere to such regulations.
SAVE THESE INSTRUCTIONS WORK AREA
Keep work area clean, free of clutter and well lit. Cluttered and dark work areas can cause accidents.
Do not use your sawmill where there is a risk of causing a fire or an explosion; e.g. in the presence of flammable liquids, gasses, or dust. Power tools create sparks, which may ignite the dust or fumes.
Keep children and bystanders away while operating a power tool. Distractions can cause you to lose control, so visitors should remain at a safe distance from the work area. Be aware of all power lines, electrical circuits, water pipes and other mechanical hazards in your work area, particularly those hazards below the work surface hidden from the operator’s view that may be unintentionally contacted and may cause personal harm or property damage.
Be alert of your surroundings. Using power tools in confined work areas may put you dangerously close to cutting tools and rotating parts.
PERSONAL SAFETY
Stay alert, watch what you are doing and use common sense when operating a power tool.
Do not use a power tool while you are tired or under the influence of drugs, alcohol or medication. A moment of inattention while operating power tools may result in serious personal injury.
Dress properly. Do not wear loose clothing, dangling objects, or jewelry. Keep your hair, clothing and gloves away from moving parts. Loose clothes, jewelry or long hair can be caught in moving parts. Air vents often cover moving parts and should be avoided.
Use safety apparel and equipment. Use safety goggles or safety glasses with side shields
which comply with current national standards, or when needed, a face shield. Use a dust mask in dusty work conditions. This applies to all persons in the work area. Also use non-skid safety shoes, hardhat, gloves, dust collection systems, and hearing protection when appropriate.
Do not over reach. Keep proper footing and balance at all times.
Remove adjusting keys or wrenches before connecting to the power supply or turning on the tool. A wrench or key that is left attached to a rotating part of the tool may result in personal injury.
Never make blade guide adjustments, remove or install blades or conduct any other maintenance or make any other adjustments when the engine is running. Always shut the engine off, remove the ignition key, and keep the engine off before carrying out any of the aforementioned procedures. Consult your engine manual for safe shutdown procedures to prevent accident ignition.
